Hey so you need to migrate that site to another server. What are the easy AND free options out there? myEASYbackup does come to save the day, although there are some details you will want to pay attention to.
Step 1: Download and Install the myEASYbackup plugin. And activate it. (No problems here)
Step 2: Go to Wordpress admin panel->Settings->myEASYbackup. Here you will need to set the correct wordpress path (if your blog does not reside in the root folder ), and choose your backup file destination.
 |
| Choose Wordpress directory |
Step 3: After updating the settings in step 2, you will be directed to the Wordpress admin->Tools->myEASYbackup panel. Do select to backup the Wordpress contents, database, and also the myEASYrestore tool.
 |
| Select the easyRestore tool |
Step 4: Select the briefcase icon to begin the backup.
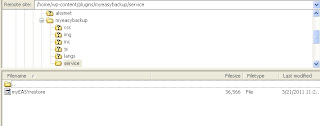
Step 5: Download the fresh backup file and also the file "myEASYrestore" from wp-content/plugins/myeasybackup/service (This step is important but not very intuitive because the instructions are found on the plugin site FAQ. )
 |
| Find the "myEASYrestore" file |
Step 6: Rename the file "myEASYrestore" to "myEASYrestore.php". Upload both files to your new server (the one you are migrating this blog to). There is no need to unzip the backup file. (Also, do not try to copy the site files or manipulate the database manually, as this can disrupt or confuse the restore process )
Step 7: Enter the URL of your new domain ending with /myEASYrestore.php
Step 8. Select the backup file to restore from and click the icon to uncompress. You may select "Use PHP code rather than
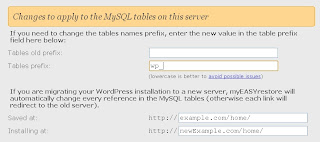
system() commands" if it otherwise does not work. Give this step some time.Step 9: Now you should be presented with a long screen. Select the correct SQL file and enter your database settings (obtain them from your web host if unsure). Also make sure the paths are correct. The Table prefix must also be correct for the database to be updated correctly!
 |
| Database table prefix and directory paths are important! |
Step 10: After all settings are done, click the server icon at the bottom and wish for the best.
Step 11: Optimistically, you should see the screen below with many green words saying done! Proceed to see your new site!
Pessimistic cases are when things do go wrong.
1.When you see red words saying some database table is not found, re-run myEASYrestore.php
- Also check that your tables prefix and installation site path names are correct. Refer to - Step 9.
2. When all you face is a blank white screen on your migrated blog :(. Try to check your database settings. Use an ftp client and find the "wp-config.php" file on your new site. Check to make sure the database name, username, password and host are all updated.
Hope this short tutorial makes your Wordpress migration task a throughly painless process.
Very helpful. Been trying to figure this out for some time now.
ReplyDeleteThanks!!