Tuesday 13 December 2011

Images not showing in WP-carousel

Share |
Images Are NOT displaying in WP-carousel with Customized Content


I was looking for a simple but elegant image slider in wordpress, and WP-carousel seemed just the right fit for my needs. Simple, elegant, but customizable. I installed and activated this plugin with good hope, but alas I just could not get any image to display in my slider with the Customized Content Item. Whats happening here? Desperately searching in the settings yielded no result.

Adding Customized Content feature - SHOW IMAGES!

Its frustrating when you can't get what seems to be a great plugin to work, and just as frustrating when you finally find out the 'great' solution. As in the image above, when adding images, make the Video URL field BLANK (Can't over-emphasize it).

Leaving the default "http://" is a big no-no. Then will the images show up in the slider... oops...

Small issue, but quite an irritation to the first time user I should say. I definitely vote for this to be changed in their next release. WP-carousel do you hear me?

Found on: WP-carousel 1.1

Monday 7 November 2011

Repair Mac OS X without installation DVD

Share |
Disk Utility - Repair Mac OS X without CD Drive / DVD

Because I frequently dual boot between Windows XP and my Mac OS, there comes a time when my Mac OS gets corrupted as well (there's no hard proof that dual boot causes this, but I would like to believe so since I have cross OS read/write operations on both).

Very well, start Disk Utility and uh oh, "repair" disk option is not available. I restart, and worse, the Mac OS startup screen just gets stuck at the circle animated wheel forever. Ok, I don't panic, went to do some searching on another pc, and tried starting Mac OS X with the "shift" keyboard button pressed down (this is said to run the "repair" disk option). Still no luck.

I CAN'T find my Mac OS installer DVDs.... I cannot run Disk Utility off it no matter how much it wants me so.

Mac OS had it all along. We just need to get into some command line stuff, and you thought Mac OS did not have this unglamorous side.

1. Restart your Mac and get into Single user mode by holding down Apple key+S all the way through the boot-up till you see the ugly black screen with text
2. After everything finishes loading, type in fsck -yf    (fsck stands for file system check). Remember to press enter after typing that of course.
3. Allow it to run and hopefully, you finally get to see the "Disk X appears to be OK." message.
4. Lastly, type "Reboot" to restart back into Mac OS X

Monday 19 September 2011

Convert FAT32 to NTFS in MAC without WINDOWS

Share |

How to convert external/internal FAT32 drive partition to NTFS with only a MAC


Long story:
Yes its the all not missed 5 year glitch with the hard disk and its all crashing down on you. Now its time to get my Mac OS back up and running which is the easy part (as usual). It is when you want the windows part as well which is the show stopper. Not sure what your unique case is but for me, I needed to switch my FAT32 partition to NTFS, and I did not have any windows installed with bootcamp to use the DOS command line. My cd-drive was faulty, so I could not use my Installer CD either, and I did not want the trouble of removing my drive physically just to bring it to a PC. Many searches online tell you to use Disk Utility in mac, but I CAN'T find that bl**dy NTFS partitioning option. Are they lying? No 3rd party commercial apps for me either.

Disk Utility with NTFS support


Long story short:
1. Download NTFS support, install, restart: http://www.tuxera.com/mac/ntfs-3g-2009.11.14u1-mac_2009-12-07_170539.dmg

2. Open Disk Utility (in mac of course), and *tada* you will now see the option to partition your drive in NTFS format

On a side note: I also recommend WinClone to conveniently archive a clone of your windows partition, makes it easy to backup and restore without re-installing and setup every time.

Note: Against user feedback on this post, I should point out that I was performing this on a fresh windows installation, so any existing windows data will be lost.

Hello fellow readers,

I have noticed a sustained number of users (in terms of 3 figures) every consecutive month on this post. I am quite curious as to the actual reasons behind you searching for and landing on this post. And more importantly, if i can provide better or more useful information to you.

Do help with a short 3 question survey on how I can better help, or you could provide some feedback.

Link to short survey on my website.
All information captured is strictly anonymous and confidential.


Friday 27 May 2011

Limit file upload according to file type extension with Regular Expressions

Share |
Yes its been a while since my last post. A day job keeps people busy. But nothing keeps me far from the web. The last time I saw some gibberish: /.+$/i 
What the... and its hard to search for too if you don't know that its called Regular Expressions (Doesn't seem all that very regular to me).


So, I was trying to allow users to do a file upload, but yet only restrict them to certain files types. Searching along the correct keywords and doing some quick learning did reveal some tricks. I do not seek to repeat the meaning of every expression here, this can be found easily. Rather, I will highlight a few pointers for those unacquainted.

Basically its a syntax, and the purpose is to do string matching. The combination of characters that you see in the gibberish above are actually rules to when tested upon your string of concern, results in a successful match, or a mismatch.

In the end, you realize that certain keyboard characters like full-stop (.) and the dollar sign ($) each represent a special meaning.

The full-stop: (Matches any single character except line break characters \r and \n. )
The dollar-sign after the full-stop: (.$ will return you a match for the last character in the string, and  ..$ will return you the last 2 characters in the string.)
The backslash: (If you want to actually test for a match of those special characters in your expression itself, and not use them programmatically. Used to escape those characters.)

I know it can seem confusing, but you can easily try it out here http://www.regular-expressions.info/javascriptexample.html for practice.

Finally for myself, I ended up with /\.wav\b|\.aif\b/


The \ escapes the full-stop that I want to match in my expression, and the \b means that I want a match of .wav file extension type at the word boundary of my file name (Assuming file name cannot be .wavRestOfFilename or .aifRestOfFilename). The | means a logical OR, either the left or right expression is accepted.

Therefore, I end up only matching files that end with file extension type of only  .wav or .aif.

Tada!


Quick links:
http://www.regular-expressions.info/reference.html
http://www.roblocher.com/technotes/regexp.aspx

Wednesday 20 April 2011

Facebook gives Adobe Flash Player error message

Share |
Facebook gives error Flash message when sharing website link

I was getting pretty frustrated this time. After adding some new features to my client's site, Facebook started giving me this error flash message which was not there before. And it did not make sense because I already had an existing flash component on the site when it worked well.

Adobe Flash error when sharing link on Facebook

The most ridiculous thing was finding out that removing every single flash component on the site did not seem to improve anything. Until after some hair pulling and intensive searching, I finally found just the answer I needed.

Taking a lead from another site, I outline the steps below (which you can add to your home page):

This changes the Title that appears when you share the link:

<meta name="title" content="Title of Article Here" />
This changes the description:

<meta name="description" content="Description of article here" />
And this links to an image of your choice:

<link rel="image_src" type="image/jpeg" href="http://www.yourdomain.com/image/path.jpg"/>

The important bit that causes many people frustration comes here, because you have to proceed on to a Facebook tool called Lint, AFTER you make your above edits. This is to update Facebook's cache about your changes. Otherwise, it won't be reflected and you will end up pulling out hair like me.

Additional Links: 
Html special characters to place in your description. Eg Open and close quotes "".
Facebook Lint Tool
Facebook discussion thread on the thumbnail image when sharing

Wednesday 13 April 2011

Add Addthis buttons Above, Not After each blogger/blogspot post

Share |

Add Addthis toolbar Above or before of each blogger post, not at the tail end!

*This post assumes you already have a blog on blogger.

Everyone is adding these social sharing toolbars these days, and what we shall look at here today is not whether their effects are useful, but rather its implementation.

Add blogger widget feature, but not what we want here.

Addthis.com has thoughtfully allowed us to conveniently add its toolbar as a blogger widget. After trying it out however, I realized that it uses javascript. And it puts the Addthis toolbar to AFTER every blog post automatically. But I wanted it BEFORE. After playing around, it seemed rather hard to massage into place, so I thought heck, lets start from scratch.


Steps to put Addthis where it belongs (at the start of every blogpost):
1. This time, select the "Website" option instead of the "Blogger" option from the Addthis website.

Select the "Website" option instead.

2. Copy the code from the right textbox.
3. Login into your blogger account and enter the desired blog's Design->Edit Html tab.
4. Remember to save a template backup if necessary.
5. Click Expand Widget Templates to reveal the full code.
6. Now search for the lines <div class='post-body entry-content'> and  <data:post.body/>
7. We want to stick the copied Addthis code in BETWEEN these 2 lines.
8. Click Preview or go ahead and Save Template if you are feeling confident today.

We are good to go once again.


Remember to click "Expand Widget Templates"
XGRCXDMVTM54 

Tuesday 22 March 2011

Reduce your wireless router Signal Strength!

Share |

Reduce your wireless router strength


It seems many people use wireless broadband routers at home nowadays. No problems with that, just that you may not need to broadcast your signals all over your neighbourhood. And also to reduce the power of the wireless waves, just to be on the safe side.

Most wireless routers have some form of settings to change the wireless broadcast strength. Today I will use the router provided by Singtel's mioTV as an example.

Step 1: Type the URL "home" into your favourite internet browser. (Yes literally "home")
For other router brands, consult your manual or manufacturer website.

Step 2: You will be presented with the Gateway Summary Page where you can access many of your router's settings.


Select Wireless Settings from the left navigation bar

Step 3: Select Wireless Settings from the left menu.

Step 4: At the bottom of the page, you will see Additional Settings. Change the Power Settings to your desired level. For me, 1 is already good enough. The factory settings was set at maximum power. No thanks, I don't need that kind of strength.

Wireless broadcast power settings

Finally, remember to save your new settings.

UPDATE - June 2016

Due to recent creations in the modern web, we now have means to verify this easily!
Do a search on your smartphone app store for "Wifi-analyzer" or something similar and it should turn up many results.

Choose one app of your liking and vio~la.

In the app below, it presents me an easy to understand graph. Hopefully yours will be less crowded. Basically you should be able to identify your chosen broadcast name, and verify that as you change your router settings, the height of your signal actually becomes lower on the graph.

wifi signals


Monday 21 March 2011

Delete and close Excite email and account FOREVER

Share |
Delete and close Excite email and account

Its interesting how hard sometimes, when you want to delete an account that just haunts you for years. It promises to self-delete if you don't touch it for a few months, but it just sticks around your back and never goes away.

Their instructions for closing their account seems buried somewhere deep in their About page.

To finally get rid of Excite email and account, I provide the link here for you.

Below the abstract from their About Page:
If you have registered with the EXCITE Site you also may choose to close your account at any time by clicking here. You will need to be signed into the member account that you would like to cancel. If you are not currently signed into an account, you will be prompted to so do during the cancellation process. You will also see the option to only cancel your EXCITE email address, and not your entire EXCITE registration, if this is your intention. Please note that it may take up to 48 hours for your cancellation request to be processed. If you are unable to sign in to cancel your account, please visit our lost password page at the following URL:http://registration.excite.com/excitereg/login_help.jsp. After you close your account, you will not be able to sign in to our website or access any of your personal information. However, you can open a new account at any time. If you close your account, we may still retain certain information associated with your account for analytical purposes and recordkeeping integrity, as well as to prevent fraud, collect any fees owed, enforce our terms and conditions, take actions we deem necessary to protect the integrity of our web site or our users, or take other actions otherwise permitted by law. In addition, if certain information has already been provided to third parties as described in this Privacy Policy, retention of that information will be subject to those third parties' policies.

myEASYbackup Tutorial on Wordpress Migration

Share |
myEASYbackup - Truly EASY or Not?

Hey so you need to migrate that site to another server. What are the easy AND free options out there? myEASYbackup does come to save the day, although there are some details you will want to pay attention to.

Step 1: Download and Install the myEASYbackup plugin. And activate it.  (No problems here)

Step 2: Go to Wordpress admin panel->Settings->myEASYbackup. Here you will need to set the correct wordpress path (if your blog does not reside in the root folder ), and choose your backup file destination.

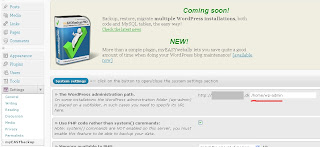
Choose Wordpress directory 

Step 3: After updating the settings in step 2, you will be directed to the Wordpress admin->Tools->myEASYbackup panel. Do select to backup the Wordpress contents, database, and also the myEASYrestore tool.

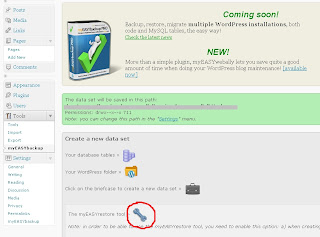
Select the easyRestore tool

Step 4: Select the briefcase icon to begin the backup.

Step 5: Download the fresh backup file and also the file "myEASYrestore" from wp-content/plugins/myeasybackup/service (This step is important but not very intuitive because the instructions are found on the plugin site FAQ. )

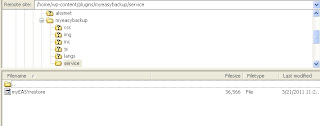
Find the "myEASYrestore" file

Step 6: Rename the file "myEASYrestore" to "myEASYrestore.php". Upload both files to your new server (the one you are migrating this blog to). There is no need to unzip the backup file. (Also, do not try to copy the site files or manipulate the database manually, as this can disrupt or confuse the restore process )

Step 7: Enter the URL of your new domain ending with /myEASYrestore.php 

Step 8. Select the backup file to restore from and click the icon to uncompress. You may select "Use PHP code rather than system() commands" if it otherwise does not work. Give this step some time.

Step 9: Now you should be presented with a long screen. Select the correct SQL file and enter your database settings (obtain them from your web host if unsure). Also make sure the paths are correct. The Table prefix must also be correct for the database to be updated correctly!

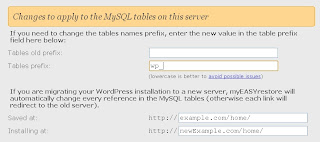
Database table prefix and directory paths are important!

Step 10: After all settings are done, click the server icon at the bottom and wish for the best.

Step 11: Optimistically, you should see the screen below with many green words saying done! Proceed to see your new site!

Pessimistic cases are when things do go wrong.

1.When you see red words saying some database table is not found, re-run  myEASYrestore.php
- Also check that your tables prefix and installation site path names are correct. Refer to - Step 9.

2. When all you face is a blank white screen on your migrated blog :(. Try to check your database settings. Use an ftp client and find the "wp-config.php" file on your new site. Check to make sure the database name, username, password and host are all updated.


Hope this short tutorial makes your Wordpress migration task a throughly painless process.


Sunday 20 March 2011

Hide the HOME link and other page links in Wordpress Main Menu

Share |
Edit your Main Menu links in template - Hypnosis-Special 1.0 by HypnoBusters. 

Ok, so its another new Wordpress site, and everytime it seems we have to edit and hide some links in the main menu. Sure goes the same routine. But something was different this time for the template - Hypnosis-Special 1.0 by HypnoBusters.

Looking in the header.php file for wp_list_pages('title_li='); did not yield any results. What do we do then?
Behold the functions.php file.

Steps:
1. Go to Wordpress admin Appearances->Editor->Theme Functions (functions.php)
2. To hide the 'Home' link, go to about line 6, change 'menu.showHome' => false, to 'menu.showHome' => true

Hide 'HOME' link (functions.php - Line 6)


3. To exclude other pages from the main menu, search for wp_list_pages('title_li=') in the same functions.php file.

Found at line 518

4. Proceed to exclude the page links you do not need. Change wp_list_pages('title_li=') to wp_list_pages('title_li=&exclude=135,130'); to exclude pages 135 and 130 for example.

5. Finally, go to Wordpress Admin Settings->Reading->Front page displays to select your static Front Page.

Then you are good to go...

Thursday 17 March 2011

Template Monster - Only Shows Email address! Where's my Content!

Share |
I was recently helping to work on a newly implemented template (Joomla template 30786) purchased from TemplateMonster.com. The current Joomla website had existing content, and we were looking forward to the new zippy look. But Wham! , things just fell flat. We saw a flash of what was to be our new look, then all that we were greeted with was an unimpressive email address and a blank white screen.

Just an email upon a blank white screen


This problem only showed up with the new template, so something was fishy. We scoured the index files, htacess files, redirect files, until finally we found the cause of this torny issue. It was Joomla's in built Email Cloak plugin. Not that we are blaming this plugin in particular, because it does work well, just not with this particular template.

The example email cloaking gibberish

We suggest either replacing the email address with a direct link to a contact form, or finding an alternative email cloaking plugin that is compatible.

Monday 14 March 2011

Paypal Sandbox Developer Confusion Mayhem

Share |
Probably the time has come again, and the client in their usual manner requests Paypal integration into their commerce website. Just before roll-out, its all too hard to avoid Paypal Sandbox to test everything before the big launch. Very often though, Paypal's sandbox do confuse developers, or forced-to-be developers (for those who take on the task).

We seek to clarify this today with yes of course, some powerful pictures.

Step 1: We log into our trusted Paypal Sandbox account at developer.paypal.com (assuming you have already created one). Everything is well and nice here, nothing unusual.

Paypal's Sandbox (developer.paypal.com)

Step 2: Create your Test Accounts (via the left panel). I will not go into the details of account creation here as this is not the focus for this post. But for testing purposes, we do want to create at least 1 buyer and 1 seller account. Note the Red Circle, I emphasize that because this tricked me up when I was doing IPN testing. And by Enabling "Payment Review", what you are requesting is "Paypal, please check all transactions". This essentially slows down the IPN response or even halts this, when you want the transaction to go through immediately. Therefore, leave it as DISABLED.

The Red Arrow, allows you to log into your created test accounts, for access to their respective settings etc. The respective radio checkbox indicates which account is selected.      

Tester accounts in Sandbox
As you will see in all the steps above, the web URL has developer in it.


Ok, so what seems to make things confusing is the next issue below. It took a while before I realized the whole idea. What Paypal allows, is also direct login of individual tester accounts from sandbox.paypal.com.


If you login from this URL, what you see is as below. As observed, this is Paypal within Paypal. So if you have been following so far, with our tester accounts created, we will end up with 3 paypal accounts here. Your developer account, 1 buyer account, and 1 seller account.

Many a times for testing purposes, what developers need to do is to access individual settings of the respective test accounts.

So at the Red Arrow, what we are supposed to do here is enter the Email address of the Tester account created earlier, NOT your developer account or any other. This will finally allow you to access individual test account settings.

I remember always searching in bewilderment, "Hey, where did my IPN settings disappear to!? I saw it awhile ago!"

Often during testing, we will need to login to both the buyer and seller account. I encountered the situation where the sandbox stops opening the correct account, confusing me and the whole process. I attribute this to the multiple accounts open on the same browser. To correct this, just manually login again to the respective buyer or seller account at sandbox.paypal.com

Paypal Sandbox (sandbox.paypal.com)

So the final note is, when you see ONE Paypal logo, you are in developer mode. Use your Paypal developer email and password to login. When you see TWO Paypal logos, you are in the sandbox mode, use the created tester buyer or seller account and password to login. Clears things up already?


Thursday 10 March 2011

SuckerFish Menu and Curved Edges in IE

Share |
As in my last post, Internet Explorer can be a pain and bane for web developers. A tool thats very useful is Adobe Browser Lab. Its great for testing your site on different browsers, as compared to other free online tools that deliver web shots to you.

And yes, back to solving sharp corners on SuckerFish menu. In my previous post, the embedded curvycorners.net method seemed to work for the other elements on my site setup, except the SuckerFish menu. That was quite queer in my opinion. I had to source for an alternative solution...meaning more time to work, and less time for play.

Finally what seemed to do the trick in IE8, was the cs3pie implementation. It was not easy as click and go in my case setup, but after ironing out some bugs, at least its presentable enough.

Getting all the box corners to be curved: a pain in IE

Wednesday 9 March 2011

Curved corners in IE

Share |
Rarrr... The part of adding curved corners in IE is just such a pain, without native CSS border-radius support. And using images for the edges is just cumbersome.

What options is a time-stripped developer to have? Even Microsoft has to give alternatives in view of this.


Method: Use Add-on Scripts

  • I found PIE to be one possibility.
Link at: http://css3pie.com/documentation/getting-started/
From css3pie.com
  • The other chance you could try is border-radius.htc
For more information.
  • Lastly, CurvyCorners is really worth a try. You can keep your current css that already works for Firefox, Chrome etc. as it converts them to work for IE. You just need a few lines of script and you are done. 
Link here: http://www.curvycorners.net/
    From curvycorners.net

    These solutions still don't work for Suckerfish menu in Internet Explorer though. 
    Will post some solution when I find one.


    Saturday 5 March 2011

    Easiest way to hide Wordpress Subdirectory Folder without moving a Single File

    Share |
    These steps assume you have wordpress already installed in a subdirectory folder.

    There seems to be many methods on the web, and sure they work, but we all want the easier way always. Iframes? Really not a good way to go. Htaccess files? Messy.

    We want to allow visitors to view your blog directly at http://example.com, not http://example.com/subfolder/

    What we can do are these simple steps:
    1. Copy your index.php file from your blog's folder to the root directory of your site
    2. In the new copied file in your root directory, change the line require('./wp-blog-header.php');  to  require('./subfolder/wp-blog-header.php');
    3. Then, log into your wordpress admin panel

    Settings -> General
    4. Keep the Wordpress address pointing to your subdirectory, but we want to change Site address to just http://example.com
    5. Lastly, we load up with our new address at http://example.com and check through just to make sure everything still works just fine. Remember to change all references with hard links in your site.

    You are all set. Go figure.

    Friday 4 March 2011

    Wordpress Login stuck in redirect!

    Share |
    Got stuck and can't login into wordpress admin, even with entering the CORRECT password?

    I was working on migrating a clients' wordpress website and made a little mistake hoo-ha. Things got messy with 2 wordpress login screens, and before I knew it, I logged myself out. Great...

    Some suggested its the browsers cookies getting confused, cleared that, and still no leadway. Finally found a post that reminded me of what happened in the split second.

    This was what happened:

    Image taken from: http://www.blakeimeson.com


    So even if you don't have access to phpAdmin, no problems. Just edit the wp-config.php file and you are good to go.

    Add the 2 lines to get yourself back on board:

    define('WP_HOME', 'http://sitename.com');
    define('WP_SITEURL', 'http://sitename.com');

    For a more complete variety of options, if this unfortunately does not work.

    Yet again, to live for another day.

    Thursday 24 February 2011

    NextGen Gallery - Secure those pictures!

    Share |
    NextGen Gallery, protect those pictures by preventing drag and drop.


    Note that we are modifying the twenty-ten theme's header file to replace the default header image with the NextGen Gallery slideshow.

    NextGen Gallery Plugin for wordpress


    Ever used NextGen Gallery plugin for wordpress, and found your site visitors just happily copying away at those precious pictures?

    It is a great plugin with the watermark feature and more, but what if we just want to deter the casual image thief just that little more?

    What I will offer now is the solution to prevent this from happening, not that it is 100% full-proof since nothing in the world is such. But here goes...

    Header.php

    1. Log in to your wordpress admin panel, and under Appearance, select Editor
    2. Select the Header.php file to edit
    3. Choose where you want to insert NextGen slideshow.(I suggest searching for "header_image()" and commenting out or removing the whole line)
    4. Add this line just after that:
    <div onmousedown="return false">
    <?php nggSlideshowWidget(1,HEADER_IMAGE_WIDTH,HEADER_IMAGE_HEIGHT); ?>
    </div>
    5. And while you are at it, you might as well disable right-click too! Follow instructions here.
    6. There its done! Users will no longer be able to drag and drop those images to their desktop.

    We have just made images harder to steal!

    Finally...
    It could possibly be a nice feature to add into the plugin for future releases.

    Wordpress Version: 3.0.3
    Theme: Twenty-ten
    NextGen Gallery Version: 1.7.4