Tuesday 22 March 2011

Reduce your wireless router Signal Strength!

Share |

Reduce your wireless router strength


It seems many people use wireless broadband routers at home nowadays. No problems with that, just that you may not need to broadcast your signals all over your neighbourhood. And also to reduce the power of the wireless waves, just to be on the safe side.

Most wireless routers have some form of settings to change the wireless broadcast strength. Today I will use the router provided by Singtel's mioTV as an example.

Step 1: Type the URL "home" into your favourite internet browser. (Yes literally "home")
For other router brands, consult your manual or manufacturer website.

Step 2: You will be presented with the Gateway Summary Page where you can access many of your router's settings.


Select Wireless Settings from the left navigation bar

Step 3: Select Wireless Settings from the left menu.

Step 4: At the bottom of the page, you will see Additional Settings. Change the Power Settings to your desired level. For me, 1 is already good enough. The factory settings was set at maximum power. No thanks, I don't need that kind of strength.

Wireless broadcast power settings

Finally, remember to save your new settings.

UPDATE - June 2016

Due to recent creations in the modern web, we now have means to verify this easily!
Do a search on your smartphone app store for "Wifi-analyzer" or something similar and it should turn up many results.

Choose one app of your liking and vio~la.

In the app below, it presents me an easy to understand graph. Hopefully yours will be less crowded. Basically you should be able to identify your chosen broadcast name, and verify that as you change your router settings, the height of your signal actually becomes lower on the graph.

wifi signals


Monday 21 March 2011

Delete and close Excite email and account FOREVER

Share |
Delete and close Excite email and account

Its interesting how hard sometimes, when you want to delete an account that just haunts you for years. It promises to self-delete if you don't touch it for a few months, but it just sticks around your back and never goes away.

Their instructions for closing their account seems buried somewhere deep in their About page.

To finally get rid of Excite email and account, I provide the link here for you.

Below the abstract from their About Page:
If you have registered with the EXCITE Site you also may choose to close your account at any time by clicking here. You will need to be signed into the member account that you would like to cancel. If you are not currently signed into an account, you will be prompted to so do during the cancellation process. You will also see the option to only cancel your EXCITE email address, and not your entire EXCITE registration, if this is your intention. Please note that it may take up to 48 hours for your cancellation request to be processed. If you are unable to sign in to cancel your account, please visit our lost password page at the following URL:http://registration.excite.com/excitereg/login_help.jsp. After you close your account, you will not be able to sign in to our website or access any of your personal information. However, you can open a new account at any time. If you close your account, we may still retain certain information associated with your account for analytical purposes and recordkeeping integrity, as well as to prevent fraud, collect any fees owed, enforce our terms and conditions, take actions we deem necessary to protect the integrity of our web site or our users, or take other actions otherwise permitted by law. In addition, if certain information has already been provided to third parties as described in this Privacy Policy, retention of that information will be subject to those third parties' policies.

myEASYbackup Tutorial on Wordpress Migration

Share |
myEASYbackup - Truly EASY or Not?

Hey so you need to migrate that site to another server. What are the easy AND free options out there? myEASYbackup does come to save the day, although there are some details you will want to pay attention to.

Step 1: Download and Install the myEASYbackup plugin. And activate it.  (No problems here)

Step 2: Go to Wordpress admin panel->Settings->myEASYbackup. Here you will need to set the correct wordpress path (if your blog does not reside in the root folder ), and choose your backup file destination.

Choose Wordpress directory 

Step 3: After updating the settings in step 2, you will be directed to the Wordpress admin->Tools->myEASYbackup panel. Do select to backup the Wordpress contents, database, and also the myEASYrestore tool.

Select the easyRestore tool

Step 4: Select the briefcase icon to begin the backup.

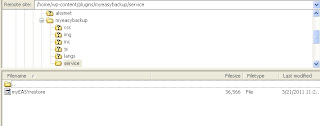
Step 5: Download the fresh backup file and also the file "myEASYrestore" from wp-content/plugins/myeasybackup/service (This step is important but not very intuitive because the instructions are found on the plugin site FAQ. )

Find the "myEASYrestore" file

Step 6: Rename the file "myEASYrestore" to "myEASYrestore.php". Upload both files to your new server (the one you are migrating this blog to). There is no need to unzip the backup file. (Also, do not try to copy the site files or manipulate the database manually, as this can disrupt or confuse the restore process )

Step 7: Enter the URL of your new domain ending with /myEASYrestore.php 

Step 8. Select the backup file to restore from and click the icon to uncompress. You may select "Use PHP code rather than system() commands" if it otherwise does not work. Give this step some time.

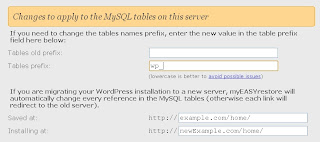
Step 9: Now you should be presented with a long screen. Select the correct SQL file and enter your database settings (obtain them from your web host if unsure). Also make sure the paths are correct. The Table prefix must also be correct for the database to be updated correctly!

Database table prefix and directory paths are important!

Step 10: After all settings are done, click the server icon at the bottom and wish for the best.

Step 11: Optimistically, you should see the screen below with many green words saying done! Proceed to see your new site!

Pessimistic cases are when things do go wrong.

1.When you see red words saying some database table is not found, re-run  myEASYrestore.php
- Also check that your tables prefix and installation site path names are correct. Refer to - Step 9.

2. When all you face is a blank white screen on your migrated blog :(. Try to check your database settings. Use an ftp client and find the "wp-config.php" file on your new site. Check to make sure the database name, username, password and host are all updated.


Hope this short tutorial makes your Wordpress migration task a throughly painless process.


Sunday 20 March 2011

Hide the HOME link and other page links in Wordpress Main Menu

Share |
Edit your Main Menu links in template - Hypnosis-Special 1.0 by HypnoBusters. 

Ok, so its another new Wordpress site, and everytime it seems we have to edit and hide some links in the main menu. Sure goes the same routine. But something was different this time for the template - Hypnosis-Special 1.0 by HypnoBusters.

Looking in the header.php file for wp_list_pages('title_li='); did not yield any results. What do we do then?
Behold the functions.php file.

Steps:
1. Go to Wordpress admin Appearances->Editor->Theme Functions (functions.php)
2. To hide the 'Home' link, go to about line 6, change 'menu.showHome' => false, to 'menu.showHome' => true

Hide 'HOME' link (functions.php - Line 6)


3. To exclude other pages from the main menu, search for wp_list_pages('title_li=') in the same functions.php file.

Found at line 518

4. Proceed to exclude the page links you do not need. Change wp_list_pages('title_li=') to wp_list_pages('title_li=&exclude=135,130'); to exclude pages 135 and 130 for example.

5. Finally, go to Wordpress Admin Settings->Reading->Front page displays to select your static Front Page.

Then you are good to go...

Thursday 17 March 2011

Template Monster - Only Shows Email address! Where's my Content!

Share |
I was recently helping to work on a newly implemented template (Joomla template 30786) purchased from TemplateMonster.com. The current Joomla website had existing content, and we were looking forward to the new zippy look. But Wham! , things just fell flat. We saw a flash of what was to be our new look, then all that we were greeted with was an unimpressive email address and a blank white screen.

Just an email upon a blank white screen


This problem only showed up with the new template, so something was fishy. We scoured the index files, htacess files, redirect files, until finally we found the cause of this torny issue. It was Joomla's in built Email Cloak plugin. Not that we are blaming this plugin in particular, because it does work well, just not with this particular template.

The example email cloaking gibberish

We suggest either replacing the email address with a direct link to a contact form, or finding an alternative email cloaking plugin that is compatible.

Monday 14 March 2011

Paypal Sandbox Developer Confusion Mayhem

Share |
Probably the time has come again, and the client in their usual manner requests Paypal integration into their commerce website. Just before roll-out, its all too hard to avoid Paypal Sandbox to test everything before the big launch. Very often though, Paypal's sandbox do confuse developers, or forced-to-be developers (for those who take on the task).

We seek to clarify this today with yes of course, some powerful pictures.

Step 1: We log into our trusted Paypal Sandbox account at developer.paypal.com (assuming you have already created one). Everything is well and nice here, nothing unusual.

Paypal's Sandbox (developer.paypal.com)

Step 2: Create your Test Accounts (via the left panel). I will not go into the details of account creation here as this is not the focus for this post. But for testing purposes, we do want to create at least 1 buyer and 1 seller account. Note the Red Circle, I emphasize that because this tricked me up when I was doing IPN testing. And by Enabling "Payment Review", what you are requesting is "Paypal, please check all transactions". This essentially slows down the IPN response or even halts this, when you want the transaction to go through immediately. Therefore, leave it as DISABLED.

The Red Arrow, allows you to log into your created test accounts, for access to their respective settings etc. The respective radio checkbox indicates which account is selected.      

Tester accounts in Sandbox
As you will see in all the steps above, the web URL has developer in it.


Ok, so what seems to make things confusing is the next issue below. It took a while before I realized the whole idea. What Paypal allows, is also direct login of individual tester accounts from sandbox.paypal.com.


If you login from this URL, what you see is as below. As observed, this is Paypal within Paypal. So if you have been following so far, with our tester accounts created, we will end up with 3 paypal accounts here. Your developer account, 1 buyer account, and 1 seller account.

Many a times for testing purposes, what developers need to do is to access individual settings of the respective test accounts.

So at the Red Arrow, what we are supposed to do here is enter the Email address of the Tester account created earlier, NOT your developer account or any other. This will finally allow you to access individual test account settings.

I remember always searching in bewilderment, "Hey, where did my IPN settings disappear to!? I saw it awhile ago!"

Often during testing, we will need to login to both the buyer and seller account. I encountered the situation where the sandbox stops opening the correct account, confusing me and the whole process. I attribute this to the multiple accounts open on the same browser. To correct this, just manually login again to the respective buyer or seller account at sandbox.paypal.com

Paypal Sandbox (sandbox.paypal.com)

So the final note is, when you see ONE Paypal logo, you are in developer mode. Use your Paypal developer email and password to login. When you see TWO Paypal logos, you are in the sandbox mode, use the created tester buyer or seller account and password to login. Clears things up already?


Thursday 10 March 2011

SuckerFish Menu and Curved Edges in IE

Share |
As in my last post, Internet Explorer can be a pain and bane for web developers. A tool thats very useful is Adobe Browser Lab. Its great for testing your site on different browsers, as compared to other free online tools that deliver web shots to you.

And yes, back to solving sharp corners on SuckerFish menu. In my previous post, the embedded curvycorners.net method seemed to work for the other elements on my site setup, except the SuckerFish menu. That was quite queer in my opinion. I had to source for an alternative solution...meaning more time to work, and less time for play.

Finally what seemed to do the trick in IE8, was the cs3pie implementation. It was not easy as click and go in my case setup, but after ironing out some bugs, at least its presentable enough.

Getting all the box corners to be curved: a pain in IE

Wednesday 9 March 2011

Curved corners in IE

Share |
Rarrr... The part of adding curved corners in IE is just such a pain, without native CSS border-radius support. And using images for the edges is just cumbersome.

What options is a time-stripped developer to have? Even Microsoft has to give alternatives in view of this.


Method: Use Add-on Scripts

  • I found PIE to be one possibility.
Link at: http://css3pie.com/documentation/getting-started/
From css3pie.com
  • The other chance you could try is border-radius.htc
For more information.
  • Lastly, CurvyCorners is really worth a try. You can keep your current css that already works for Firefox, Chrome etc. as it converts them to work for IE. You just need a few lines of script and you are done. 
Link here: http://www.curvycorners.net/
    From curvycorners.net

    These solutions still don't work for Suckerfish menu in Internet Explorer though. 
    Will post some solution when I find one.


    Saturday 5 March 2011

    Easiest way to hide Wordpress Subdirectory Folder without moving a Single File

    Share |
    These steps assume you have wordpress already installed in a subdirectory folder.

    There seems to be many methods on the web, and sure they work, but we all want the easier way always. Iframes? Really not a good way to go. Htaccess files? Messy.

    We want to allow visitors to view your blog directly at http://example.com, not http://example.com/subfolder/

    What we can do are these simple steps:
    1. Copy your index.php file from your blog's folder to the root directory of your site
    2. In the new copied file in your root directory, change the line require('./wp-blog-header.php');  to  require('./subfolder/wp-blog-header.php');
    3. Then, log into your wordpress admin panel

    Settings -> General
    4. Keep the Wordpress address pointing to your subdirectory, but we want to change Site address to just http://example.com
    5. Lastly, we load up with our new address at http://example.com and check through just to make sure everything still works just fine. Remember to change all references with hard links in your site.

    You are all set. Go figure.

    Friday 4 March 2011

    Wordpress Login stuck in redirect!

    Share |
    Got stuck and can't login into wordpress admin, even with entering the CORRECT password?

    I was working on migrating a clients' wordpress website and made a little mistake hoo-ha. Things got messy with 2 wordpress login screens, and before I knew it, I logged myself out. Great...

    Some suggested its the browsers cookies getting confused, cleared that, and still no leadway. Finally found a post that reminded me of what happened in the split second.

    This was what happened:

    Image taken from: http://www.blakeimeson.com


    So even if you don't have access to phpAdmin, no problems. Just edit the wp-config.php file and you are good to go.

    Add the 2 lines to get yourself back on board:

    define('WP_HOME', 'http://sitename.com');
    define('WP_SITEURL', 'http://sitename.com');

    For a more complete variety of options, if this unfortunately does not work.

    Yet again, to live for another day.