Yes its been a while since my last post. A day job keeps people busy. But nothing keeps me far from the web. The last time I saw some gibberish: /.+$/i
What the... and its hard to search for too if you don't know that its called Regular Expressions (Doesn't seem all that very regular to me).
So, I was trying to allow users to do a file upload, but yet only restrict them to certain files types. Searching along the correct keywords and doing some quick learning did reveal some tricks. I do not seek to repeat the meaning of every expression here, this can be found easily. Rather, I will highlight a few pointers for those unacquainted.
Basically its a syntax, and the purpose is to do string matching. The combination of characters that you see in the gibberish above are actually rules to when tested upon your string of concern, results in a successful match, or a mismatch.
In the end, you realize that certain keyboard characters like full-stop (.) and the dollar sign ($) each represent a special meaning.
The full-stop: (Matches any single character except line break characters \r and \n. )
The dollar-sign after the full-stop: (.$ will return you a match for the last character in the string, and ..$ will return you the last 2 characters in the string.)
The backslash: (If you want to actually test for a match of those special characters in your expression itself, and not use them programmatically. Used to escape those characters.)
I know it can seem confusing, but you can easily try it out here http://www.regular-expressions.info/javascriptexample.html for practice.
Finally for myself, I ended up with /\.wav\b|\.aif\b/
The \ escapes the full-stop that I want to match in my expression, and the \b means that I want a match of .wav file extension type at the word boundary of my file name (Assuming file name cannot be .wavRestOfFilename or .aifRestOfFilename). The | means a logical OR, either the left or right expression is accepted.
Therefore, I end up only matching files that end with file extension type of only .wav or .aif.
Tada!
Quick links:
http://www.regular-expressions.info/reference.html
http://www.roblocher.com/technotes/regexp.aspx
Friday, 27 May 2011
Wednesday, 20 April 2011
Facebook gives Adobe Flash Player error message
Facebook gives error Flash message when sharing website link
I was getting pretty frustrated this time. After adding some new features to my client's site, Facebook started giving me this error flash message which was not there before. And it did not make sense because I already had an existing flash component on the site when it worked well.
The most ridiculous thing was finding out that removing every single flash component on the site did not seem to improve anything. Until after some hair pulling and intensive searching, I finally found just the answer I needed.
Taking a lead from another site, I outline the steps below (which you can add to your home page):
This changes the Title that appears when you share the link:
The important bit that causes many people frustration comes here, because you have to proceed on to a Facebook tool called Lint, AFTER you make your above edits. This is to update Facebook's cache about your changes. Otherwise, it won't be reflected and you will end up pulling out hair like me.
Additional Links:
Html special characters to place in your description. Eg Open and close quotes "".
Facebook Lint Tool
Facebook discussion thread on the thumbnail image when sharing
I was getting pretty frustrated this time. After adding some new features to my client's site, Facebook started giving me this error flash message which was not there before. And it did not make sense because I already had an existing flash component on the site when it worked well.
 |
| Adobe Flash error when sharing link on Facebook |
The most ridiculous thing was finding out that removing every single flash component on the site did not seem to improve anything. Until after some hair pulling and intensive searching, I finally found just the answer I needed.
Taking a lead from another site, I outline the steps below (which you can add to your home page):
This changes the Title that appears when you share the link:
<meta name="title" content="Title of Article Here" />This changes the description:<meta name="description" content="Description of article here" />And this links to an image of your choice:
<link rel="image_src" type="image/jpeg" href="http://www.yourdomain.com/image/path.jpg"/>
The important bit that causes many people frustration comes here, because you have to proceed on to a Facebook tool called Lint, AFTER you make your above edits. This is to update Facebook's cache about your changes. Otherwise, it won't be reflected and you will end up pulling out hair like me.
Additional Links:
Html special characters to place in your description. Eg Open and close quotes "".
Facebook Lint Tool
Facebook discussion thread on the thumbnail image when sharing
Wednesday, 13 April 2011
Add Addthis buttons Above, Not After each blogger/blogspot post
Add Addthis toolbar Above or before of each blogger post, not at the tail end!
Everyone is adding these social sharing toolbars these days, and what we shall look at here today is not whether their effects are useful, but rather its implementation.
 |
| Add blogger widget feature, but not what we want here. |
Addthis.com has thoughtfully allowed us to conveniently add its toolbar as a blogger widget. After trying it out however, I realized that it uses javascript. And it puts the Addthis toolbar to AFTER every blog post automatically. But I wanted it BEFORE. After playing around, it seemed rather hard to massage into place, so I thought heck, lets start from scratch.
Steps to put Addthis where it belongs (at the start of every blogpost):
1. This time, select the "Website" option instead of the "Blogger" option from the Addthis website.
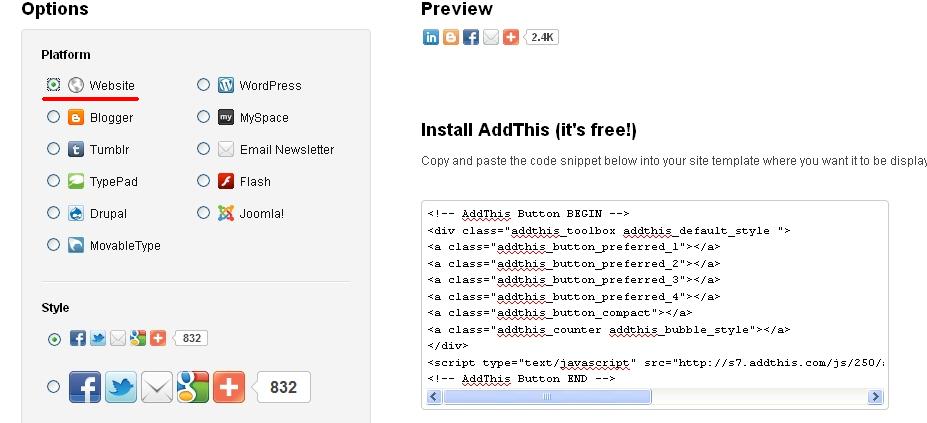 |
| Select the "Website" option instead. |
3. Login into your blogger account and enter the desired blog's Design->Edit Html tab.
4. Remember to save a template backup if necessary.
5. Click Expand Widget Templates to reveal the full code.
6. Now search for the lines <div class='post-body entry-content'> and <data:post.body/>
7. We want to stick the copied Addthis code in BETWEEN these 2 lines.
8. Click Preview or go ahead and Save Template if you are feeling confident today.
We are good to go once again.
 |
| Remember to click "Expand Widget Templates" |
Tuesday, 22 March 2011
Reduce your wireless router Signal Strength!
Reduce your wireless router strength
It seems many people use wireless broadband routers at home nowadays. No problems with that, just that you may not need to broadcast your signals all over your neighbourhood. And also to reduce the power of the wireless waves, just to be on the safe side.
Most wireless routers have some form of settings to change the wireless broadcast strength. Today I will use the router provided by Singtel's mioTV as an example.
Step 1: Type the URL "home" into your favourite internet browser. (Yes literally "home")
For other router brands, consult your manual or manufacturer website.
Step 2: You will be presented with the Gateway Summary Page where you can access many of your router's settings.
 |
| Select Wireless Settings from the left navigation bar |
Step 3: Select Wireless Settings from the left menu.
Step 4: At the bottom of the page, you will see Additional Settings. Change the Power Settings to your desired level. For me, 1 is already good enough. The factory settings was set at maximum power. No thanks, I don't need that kind of strength.
 |
| Wireless broadcast power settings |
Finally, remember to save your new settings.
Do a search on your smartphone app store for "Wifi-analyzer" or something similar and it should turn up many results.
Choose one app of your liking and vio~la.
In the app below, it presents me an easy to understand graph. Hopefully yours will be less crowded. Basically you should be able to identify your chosen broadcast name, and verify that as you change your router settings, the height of your signal actually becomes lower on the graph.

UPDATE - June 2016
Due to recent creations in the modern web, we now have means to verify this easily!Do a search on your smartphone app store for "Wifi-analyzer" or something similar and it should turn up many results.
Choose one app of your liking and vio~la.
In the app below, it presents me an easy to understand graph. Hopefully yours will be less crowded. Basically you should be able to identify your chosen broadcast name, and verify that as you change your router settings, the height of your signal actually becomes lower on the graph.

Monday, 21 March 2011
Delete and close Excite email and account FOREVER
Delete and close Excite email and account
Its interesting how hard sometimes, when you want to delete an account that just haunts you for years. It promises to self-delete if you don't touch it for a few months, but it just sticks around your back and never goes away.
Their instructions for closing their account seems buried somewhere deep in their About page.
To finally get rid of Excite email and account, I provide the link here for you.
Below the abstract from their About Page:
If you have registered with the EXCITE Site you also may choose to close your account at any time by clicking here. You will need to be signed into the member account that you would like to cancel. If you are not currently signed into an account, you will be prompted to so do during the cancellation process. You will also see the option to only cancel your EXCITE email address, and not your entire EXCITE registration, if this is your intention. Please note that it may take up to 48 hours for your cancellation request to be processed. If you are unable to sign in to cancel your account, please visit our lost password page at the following URL:http://registration.excite.com/excitereg/login_help.jsp. After you close your account, you will not be able to sign in to our website or access any of your personal information. However, you can open a new account at any time. If you close your account, we may still retain certain information associated with your account for analytical purposes and recordkeeping integrity, as well as to prevent fraud, collect any fees owed, enforce our terms and conditions, take actions we deem necessary to protect the integrity of our web site or our users, or take other actions otherwise permitted by law. In addition, if certain information has already been provided to third parties as described in this Privacy Policy, retention of that information will be subject to those third parties' policies.
myEASYbackup Tutorial on Wordpress Migration
myEASYbackup - Truly EASY or Not?
Hey so you need to migrate that site to another server. What are the easy AND free options out there? myEASYbackup does come to save the day, although there are some details you will want to pay attention to.
Step 1: Download and Install the myEASYbackup plugin. And activate it. (No problems here)
Step 2: Go to Wordpress admin panel->Settings->myEASYbackup. Here you will need to set the correct wordpress path (if your blog does not reside in the root folder ), and choose your backup file destination.
Step 3: After updating the settings in step 2, you will be directed to the Wordpress admin->Tools->myEASYbackup panel. Do select to backup the Wordpress contents, database, and also the myEASYrestore tool.
Step 4: Select the briefcase icon to begin the backup.
Step 5: Download the fresh backup file and also the file "myEASYrestore" from wp-content/plugins/myeasybackup/service (This step is important but not very intuitive because the instructions are found on the plugin site FAQ. )
Step 6: Rename the file "myEASYrestore" to "myEASYrestore.php". Upload both files to your new server (the one you are migrating this blog to). There is no need to unzip the backup file. (Also, do not try to copy the site files or manipulate the database manually, as this can disrupt or confuse the restore process )
Step 7: Enter the URL of your new domain ending with /myEASYrestore.php
Step 8. Select the backup file to restore from and click the icon to uncompress. You may select "Use PHP code rather than
Step 9: Now you should be presented with a long screen. Select the correct SQL file and enter your database settings (obtain them from your web host if unsure). Also make sure the paths are correct. The Table prefix must also be correct for the database to be updated correctly!
Step 10: After all settings are done, click the server icon at the bottom and wish for the best.
Step 11: Optimistically, you should see the screen below with many green words saying done! Proceed to see your new site!
Pessimistic cases are when things do go wrong.
1.When you see red words saying some database table is not found, re-run myEASYrestore.php
- Also check that your tables prefix and installation site path names are correct. Refer to - Step 9.
2. When all you face is a blank white screen on your migrated blog :(. Try to check your database settings. Use an ftp client and find the "wp-config.php" file on your new site. Check to make sure the database name, username, password and host are all updated.
Hope this short tutorial makes your Wordpress migration task a throughly painless process.
Hey so you need to migrate that site to another server. What are the easy AND free options out there? myEASYbackup does come to save the day, although there are some details you will want to pay attention to.
Step 1: Download and Install the myEASYbackup plugin. And activate it. (No problems here)
Step 2: Go to Wordpress admin panel->Settings->myEASYbackup. Here you will need to set the correct wordpress path (if your blog does not reside in the root folder ), and choose your backup file destination.
 |
| Choose Wordpress directory |
Step 3: After updating the settings in step 2, you will be directed to the Wordpress admin->Tools->myEASYbackup panel. Do select to backup the Wordpress contents, database, and also the myEASYrestore tool.
 |
| Select the easyRestore tool |
Step 4: Select the briefcase icon to begin the backup.
Step 5: Download the fresh backup file and also the file "myEASYrestore" from wp-content/plugins/myeasybackup/service (This step is important but not very intuitive because the instructions are found on the plugin site FAQ. )
 |
| Find the "myEASYrestore" file |
Step 6: Rename the file "myEASYrestore" to "myEASYrestore.php". Upload both files to your new server (the one you are migrating this blog to). There is no need to unzip the backup file. (Also, do not try to copy the site files or manipulate the database manually, as this can disrupt or confuse the restore process )
Step 7: Enter the URL of your new domain ending with /myEASYrestore.php
Step 8. Select the backup file to restore from and click the icon to uncompress. You may select "Use PHP code rather than
system() commands" if it otherwise does not work. Give this step some time.Step 9: Now you should be presented with a long screen. Select the correct SQL file and enter your database settings (obtain them from your web host if unsure). Also make sure the paths are correct. The Table prefix must also be correct for the database to be updated correctly!
 |
| Database table prefix and directory paths are important! |
Step 10: After all settings are done, click the server icon at the bottom and wish for the best.
Step 11: Optimistically, you should see the screen below with many green words saying done! Proceed to see your new site!
Pessimistic cases are when things do go wrong.
1.When you see red words saying some database table is not found, re-run myEASYrestore.php
- Also check that your tables prefix and installation site path names are correct. Refer to - Step 9.
2. When all you face is a blank white screen on your migrated blog :(. Try to check your database settings. Use an ftp client and find the "wp-config.php" file on your new site. Check to make sure the database name, username, password and host are all updated.
Hope this short tutorial makes your Wordpress migration task a throughly painless process.
Sunday, 20 March 2011
Hide the HOME link and other page links in Wordpress Main Menu
Edit your Main Menu links in template - Hypnosis-Special 1.0 by HypnoBusters.
Ok, so its another new Wordpress site, and everytime it seems we have to edit and hide some links in the main menu. Sure goes the same routine. But something was different this time for the template - Hypnosis-Special 1.0 by HypnoBusters.
Looking in the header.php file for wp_list_pages('title_li='); did not yield any results. What do we do then?
Behold the functions.php file.
Steps:
1. Go to Wordpress admin Appearances->Editor->Theme Functions (functions.php)
2. To hide the 'Home' link, go to about line 6, change 'menu.showHome' => false, to 'menu.showHome' => true
3. To exclude other pages from the main menu, search for wp_list_pages('title_li=') in the same functions.php file.
4. Proceed to exclude the page links you do not need. Change wp_list_pages('title_li=') to wp_list_pages('title_li=&exclude=135,130'); to exclude pages 135 and 130 for example.
5. Finally, go to Wordpress Admin Settings->Reading->Front page displays to select your static Front Page.
Then you are good to go...
Ok, so its another new Wordpress site, and everytime it seems we have to edit and hide some links in the main menu. Sure goes the same routine. But something was different this time for the template - Hypnosis-Special 1.0 by HypnoBusters.
Looking in the header.php file for wp_list_pages('title_li='); did not yield any results. What do we do then?
Behold the functions.php file.
Steps:
1. Go to Wordpress admin Appearances->Editor->Theme Functions (functions.php)
2. To hide the 'Home' link, go to about line 6, change 'menu.showHome' => false, to 'menu.showHome' => true
 |
| Hide 'HOME' link (functions.php - Line 6) |
3. To exclude other pages from the main menu, search for wp_list_pages('title_li=') in the same functions.php file.
 |
| Found at line 518 |
4. Proceed to exclude the page links you do not need. Change wp_list_pages('title_li=') to wp_list_pages('title_li=&exclude=135,130'); to exclude pages 135 and 130 for example.
5. Finally, go to Wordpress Admin Settings->Reading->Front page displays to select your static Front Page.
Then you are good to go...
Subscribe to:
Posts (Atom)